How to Enable Hodlnaut’s Withdrawal Whitelist Feature?

Hodlnaut’s Withdrawal Whitelist (Address Whitelisting) feature is an additional security feature besides the two-factor authentication (2FA). It ensures that the crypto assets in your Hodlnaut account are only sent to known and verified withdrawal addresses. In essence, with this feature, you can restrict crypto withdrawals to a list of known addresses only.
After enabling whitelisting from your account settings (steps mentioned below), you will be prompted to create a list of known addresses. Before we take a look at the steps, here is what you need to know about this feature:
- Once you enable Withdrawal Whitelist, you will not be able to withdraw funds until the address is added to your withdrawal list.
- You will have to wait for 48 hours before we approve the whitelist to go ahead with your withdrawal.
Note: We recommend that you add the known addresses to your whitelist right away so that you can seamlessly withdraw funds.
Why Enable Withdrawal Whitelist?
The Withdrawal Whitelisting feature is an additional security step that protects your crypto assets. For instance, if a hacker somehow gets a hold of your password and 2FA, he/she will not be able to withdraw your funds to their address without waiting for 48 hours. In the meantime, you will realize that your account is hacked, and you can thus contact us to take further action (like freezing your account).
We highly recommend enabling withdrawal whitelisting for utmost security, and here is how you can do it.
How to Enable Withdrawal Whitelist Feature?
On the Web
Step 1: Log into your Hodlnaut account and navigate to your name on the top right.
Log into your Hodlnaut account, and on the top right, click on your name to view the drop-down list as shown below.

Step 2: Click on User Settings
Scroll down and navigate to the Withdrawal Whitelist feature.
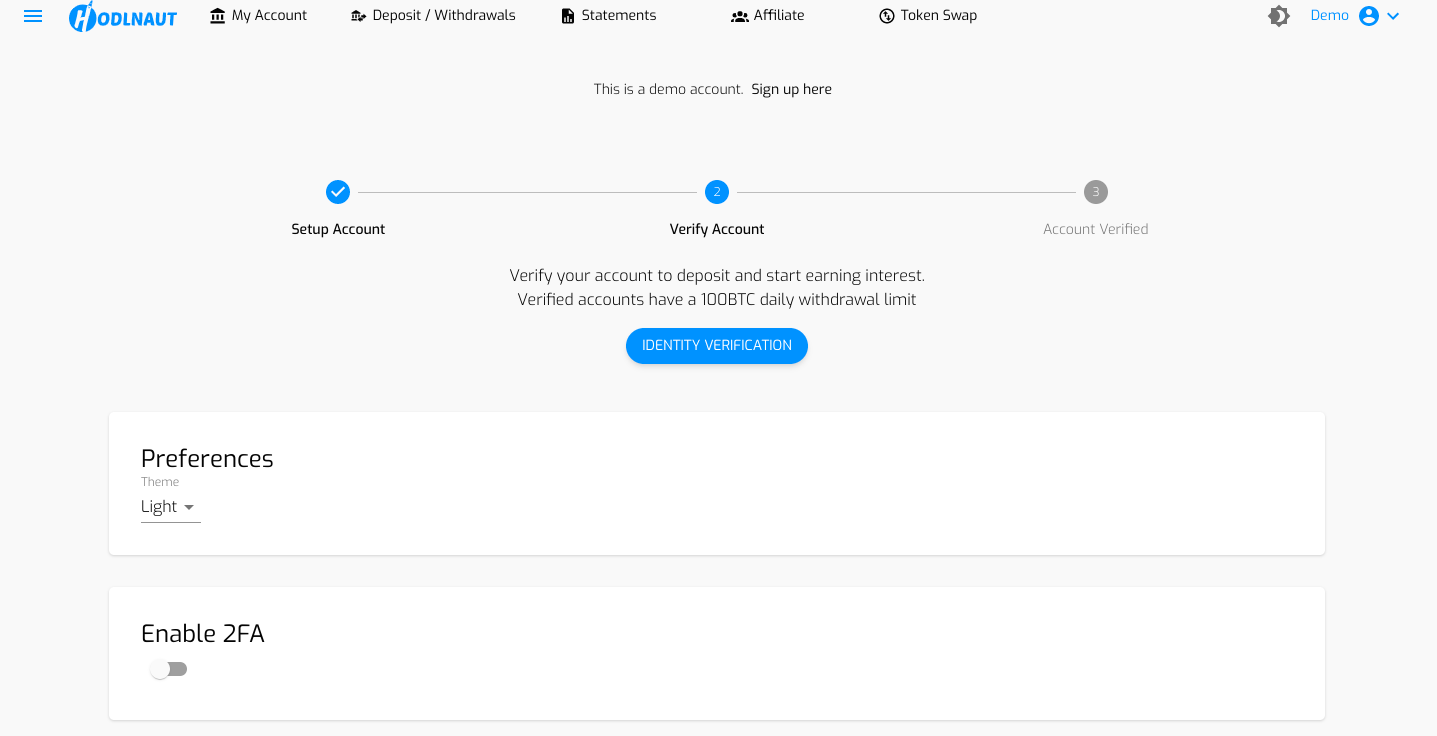
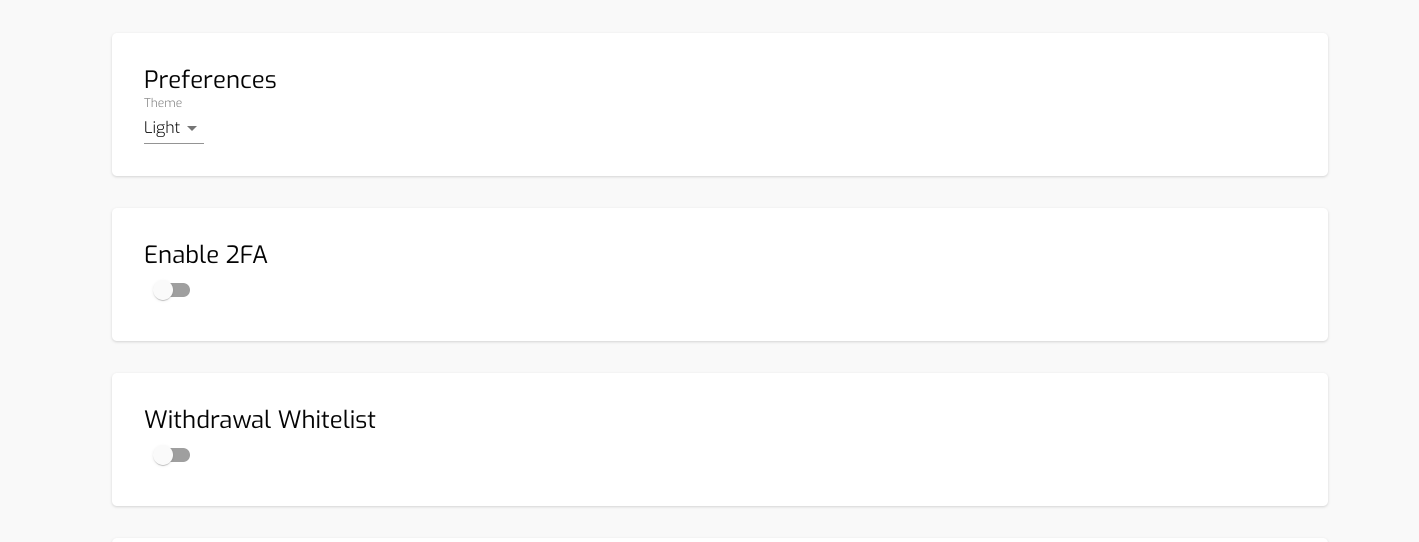
Step 3: Enable Withdrawal Whitelist
Next up, enable the withdrawal whitelist feature, and you will see a prompt as shown below. Enter the 6-digit code, which will be sent to your Google Authenticator, and submit the code to enable the feature.
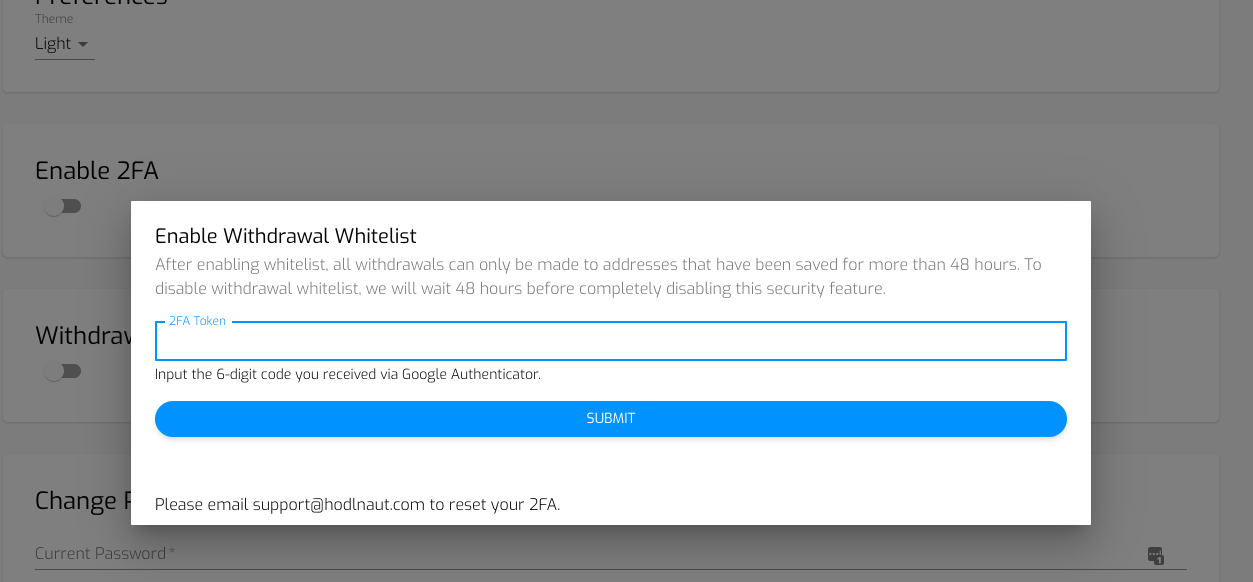
Step 4: Submit the 6-digit code via Google Authenticator
After submitting the code, you can add the addresses to the whitelist.
Step 5: Head over to the "Deposit / Withdrawal" tab and scroll down to the Withdrawal section
Navigate to the withdrawal section to populate the list of saved addresses.
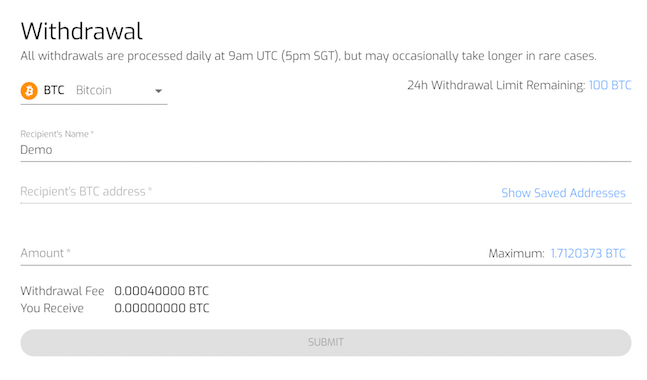
Step 6: Click on "Show Saved Addresses" and a list will appear
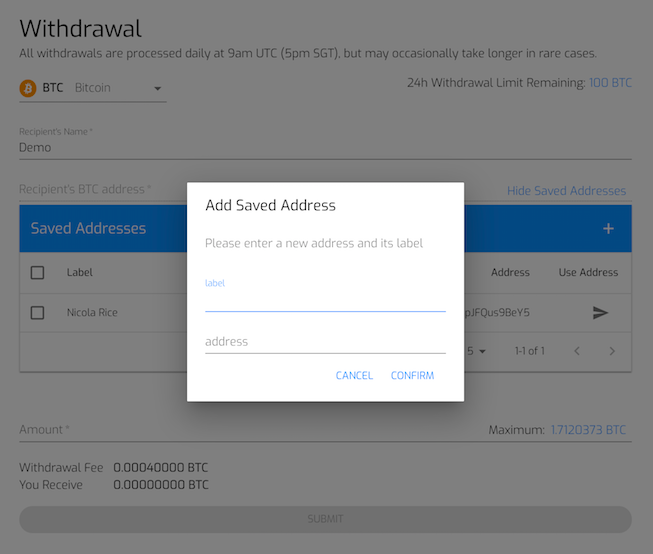
Click on "Show Saved Addresses" and you can view a table where you can add the addresses you wish to whitelist. Click on the + icon the on the top right hand corner.

Step 7: Click on the "+" button and you can start adding your addresses to be whitelisted
Click the "+" button and you can add the addresses you would like to whitelist for your account.
On the iOS Mobile App
1. Log in to your Hodlnaut Account on the iOS Mobile App

2. Click on “Account and Security”
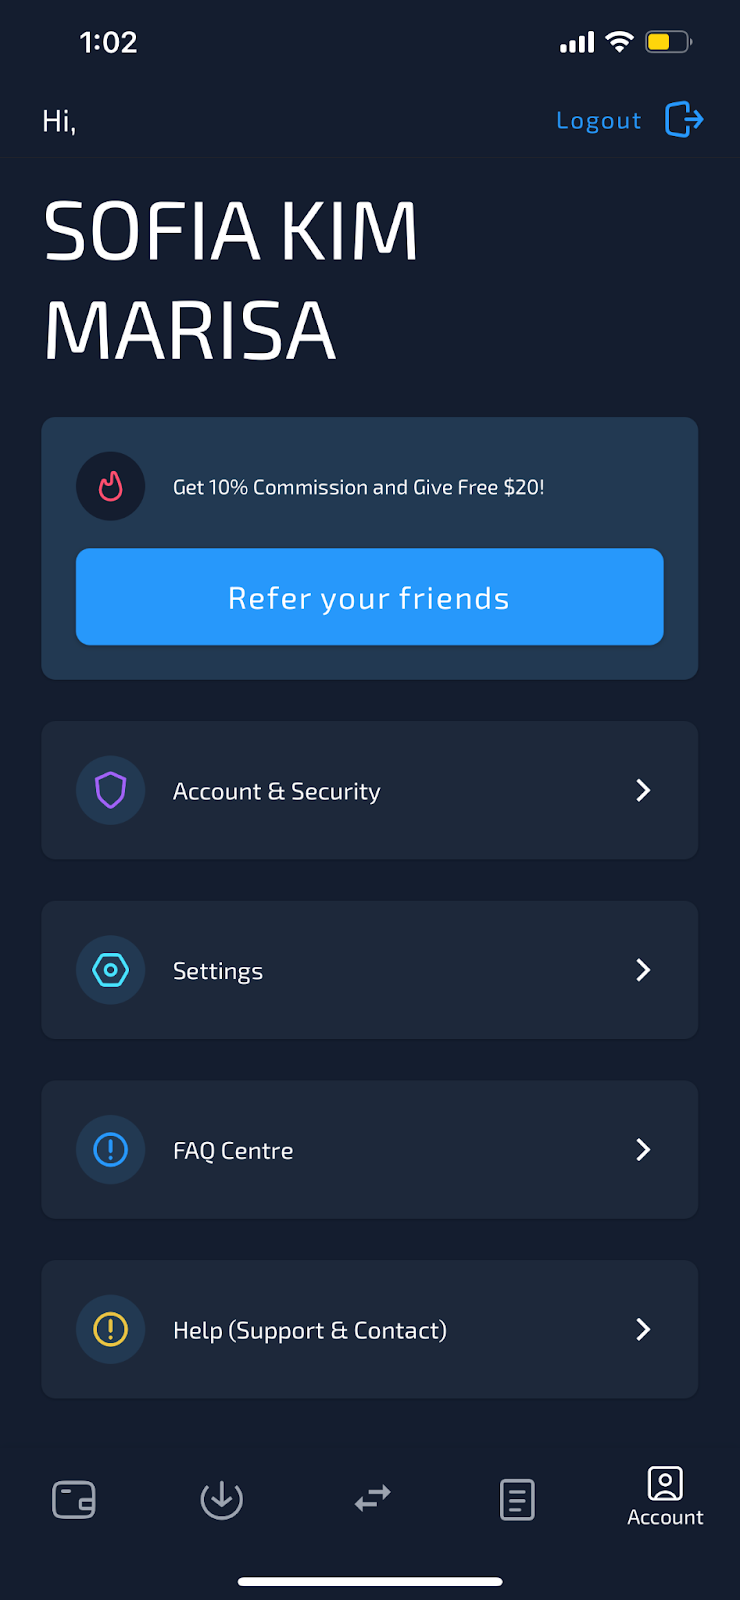
Once logged in, click on the Account button on the bottom right of the dashboard. You will then see an Account & Security Tab. Click on it.
3. Enable the Withdrawal Whitelist feature
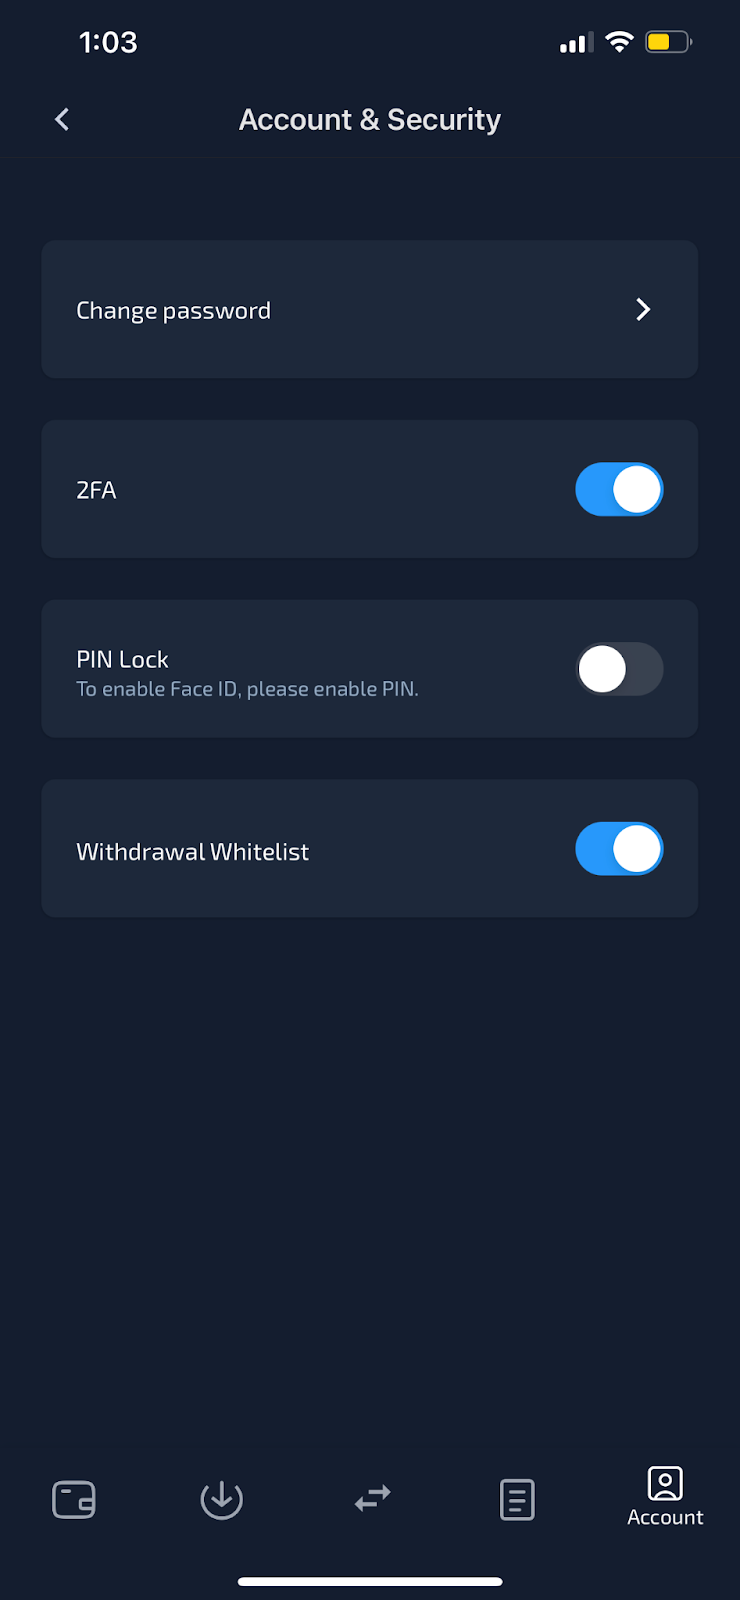
After clicking on “Account and Security”, you will see a dashboard as shown in the image above. Next, tap on the button to enable the withdrawal whitelist feature.
4. Obtain the 6-digit code from any authenticator application
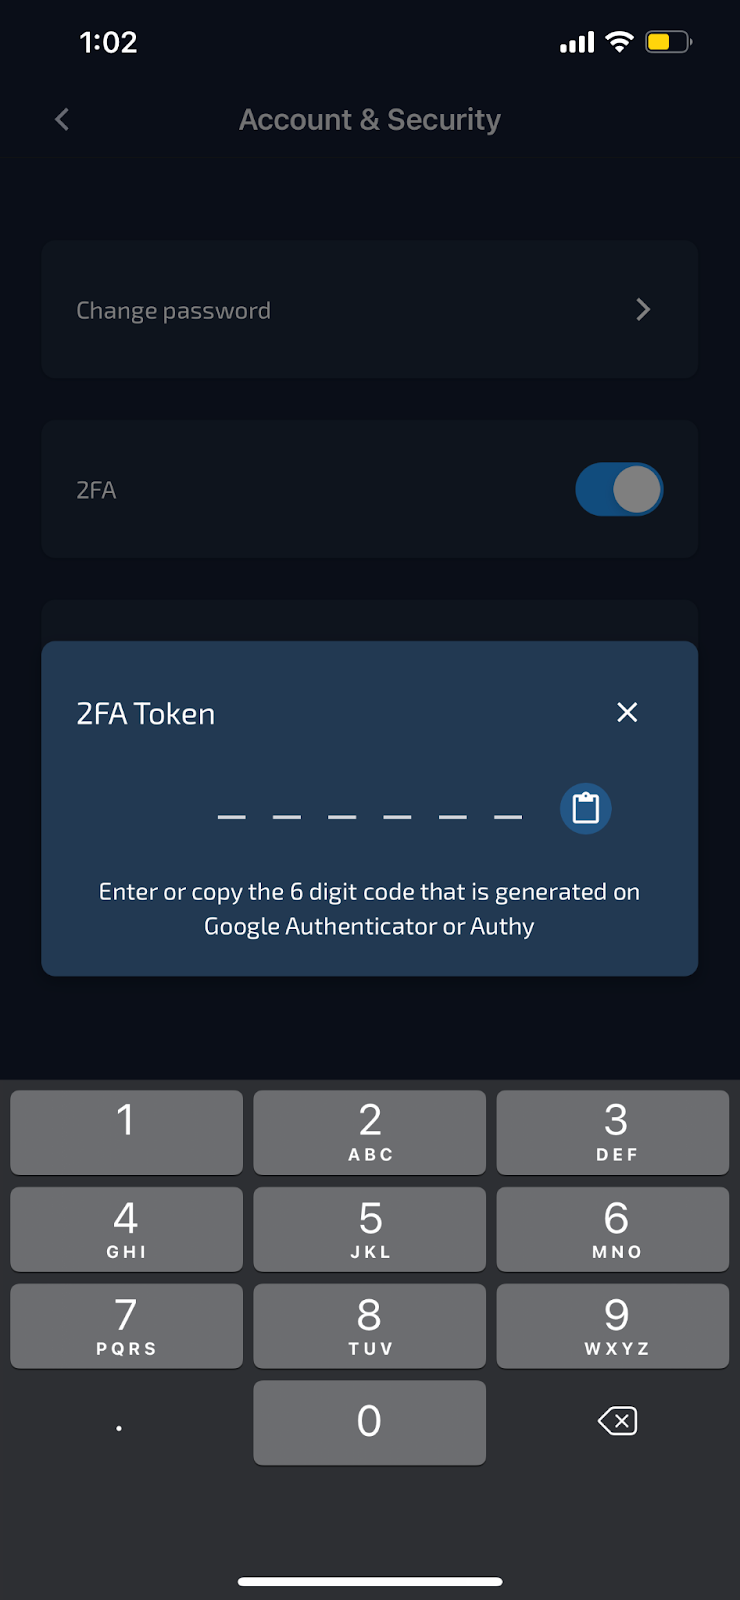
After enabling, you will see a prompt to enter a 6-digit code from any authenticator application such as Google Authenticator.
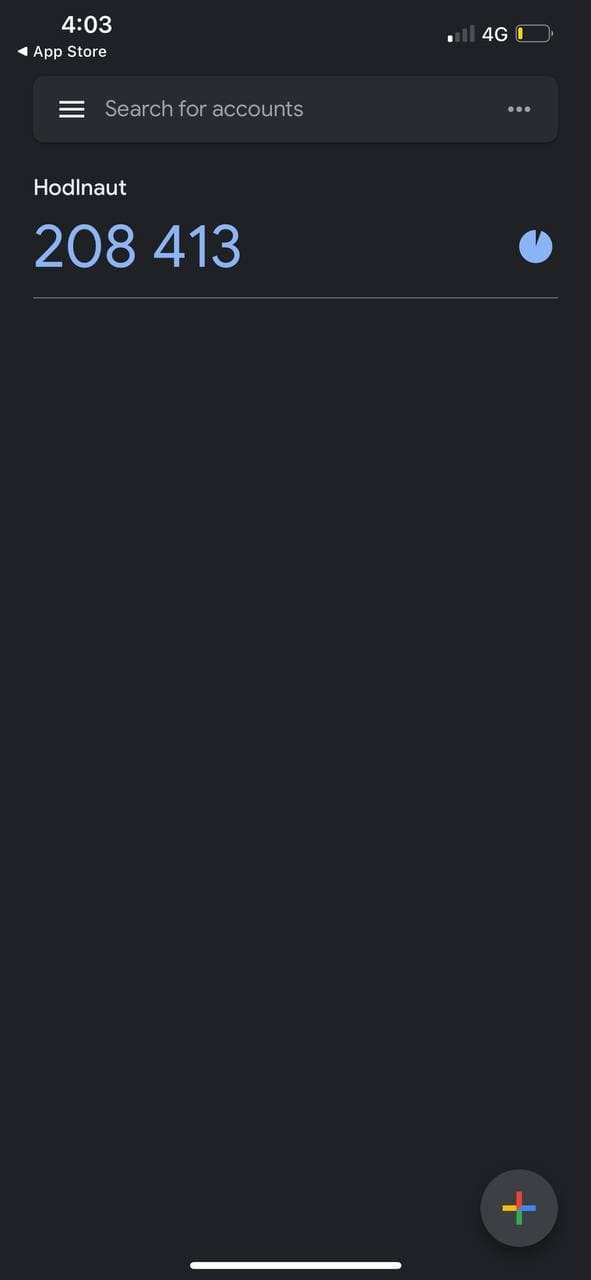
Head over to your authenticator app to retrieve the 6-digit code. Do note that the code expires after 30 seconds. Once you have copied the code, head back to the Hodlnaut app and enter the 6-digit code to enable the feature.
5. Click on any currency on the Wallet Page to withdraw
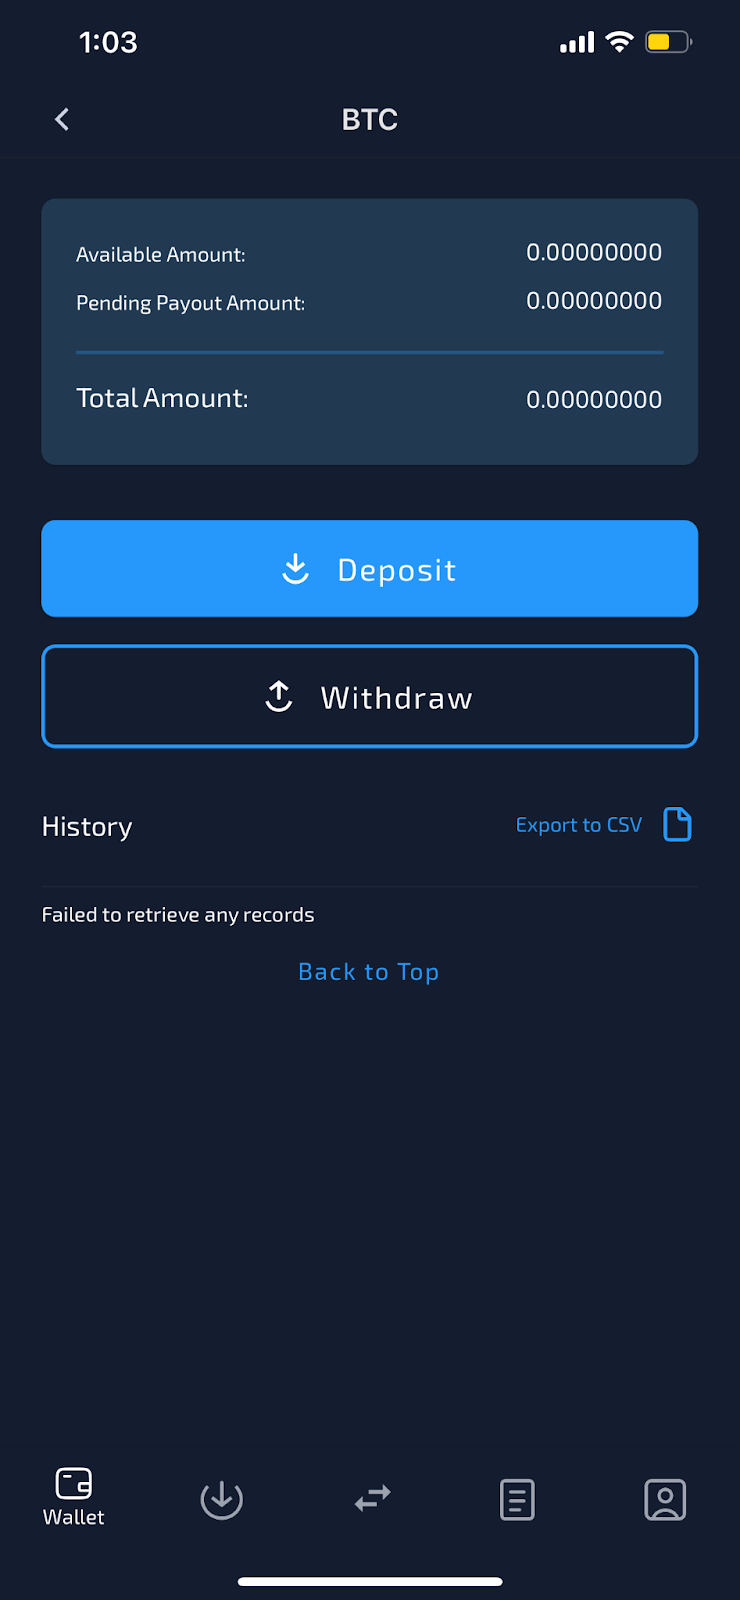
To withdraw, click on any asset on the Wallet page. For example, if you intend to withdraw BTC, tap on BTC. Next, click on Withdraw.
6. Tap on the “Saved Addresses” icon
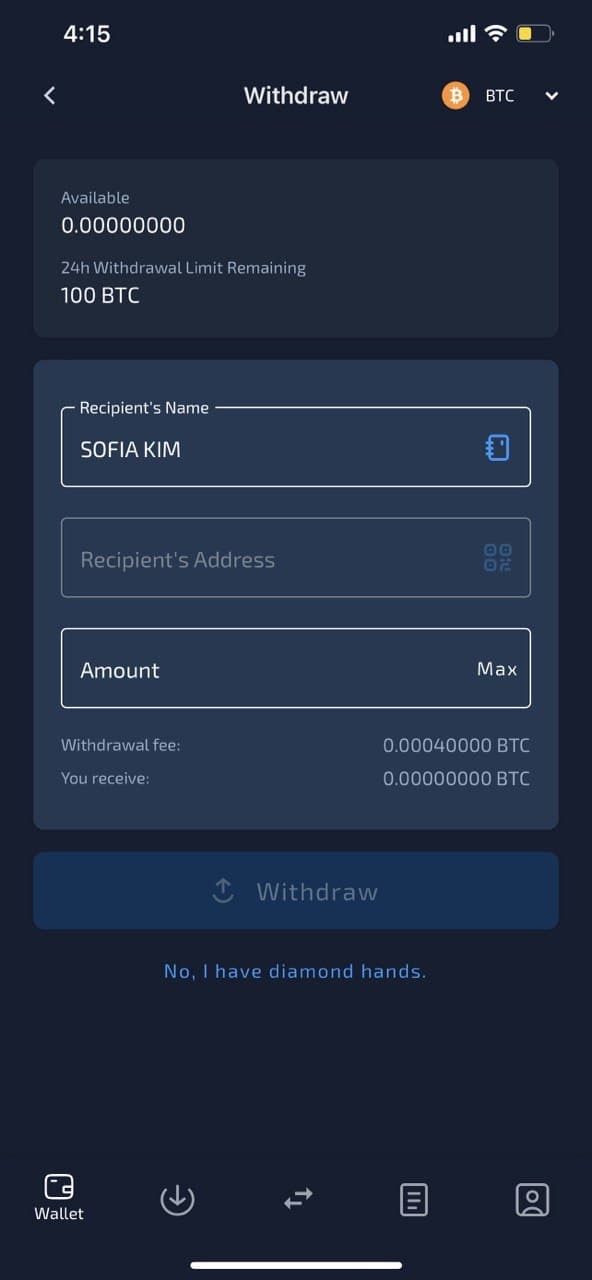
After tapping on Withdraw, you’ll see a page like this. You will notice that the Recipient Address field is disabled. To withdraw, click on the Saved Addresses icon next to the recipient name.
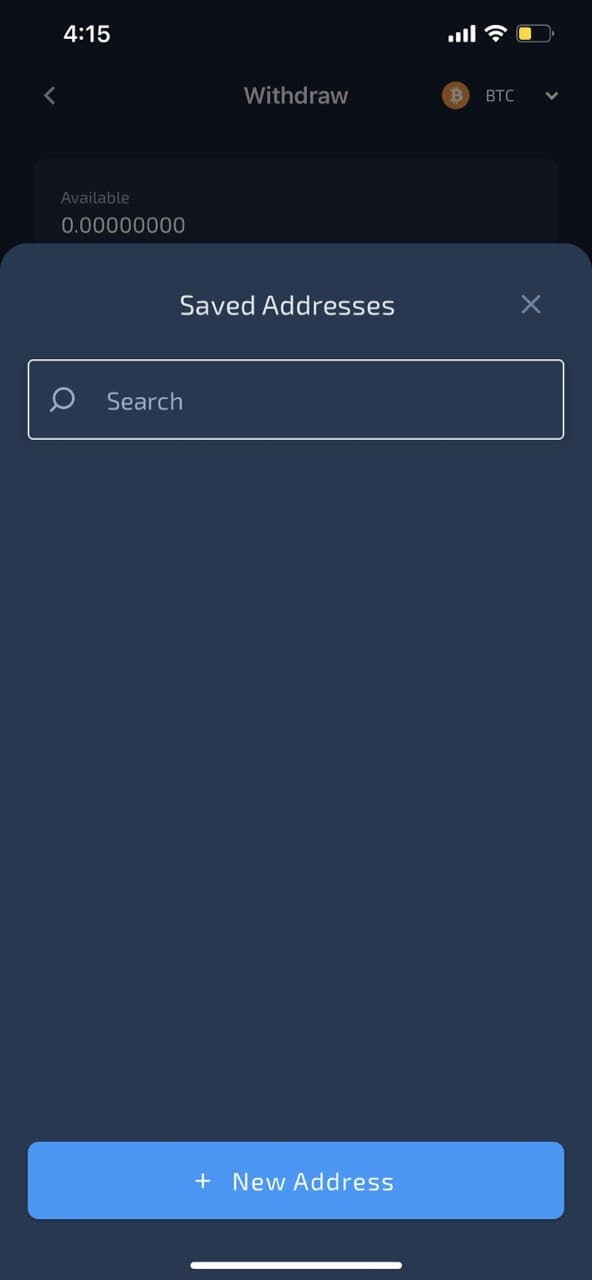
Once done, you can view the whitelisted addresses here.
7. Click on the "+ New Address" button and you can start adding your addresses to be whitelisted
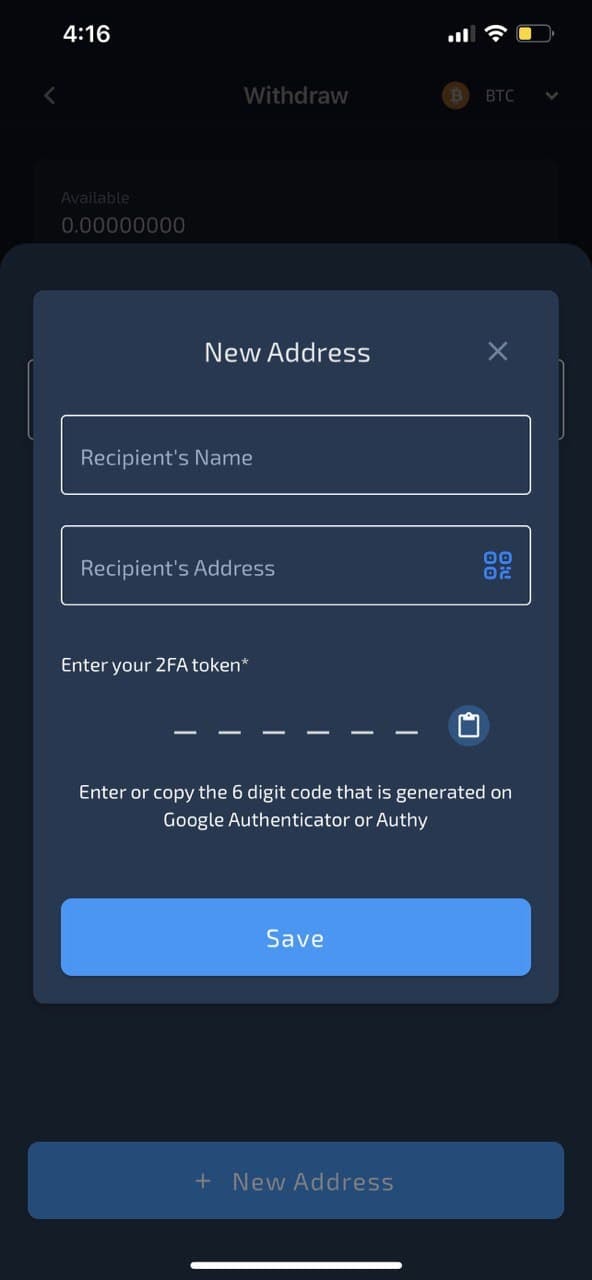
If you wish to add a new address, tap on + New Address. You will then be required to include the recipient’s name and address, and retrieve the code from your authenticator application.
And you are done! After submitting the code, you can add the addresses to the whitelist, and you will receive an email confirmation once it is verified and whitelisted (typically within 48 hours).
The above steps will help you use the Withdrawal Whitelist feature to secure your account and protect your cryptocurrency while you HODL with Hodlnaut.
If you’re new to Hodlnaut, be sure to sign up today and start earning interest on your crypto! If you have any questions, be sure to drop us an email at support@hodlnaut.com and we will get back to you as soon as we can.
Disclaimer: By using Hodlnaut, users expressly acknowledge and agree to the Terms of Use listed on our website at www.hodlnaut.com. This includes the relevant risk warnings applicable to you as a user of Hodlnaut's services, prior to/when carrying out Digital Payment Token (DPT) transactions. This article is for informational purposes only, and is not an offer nor a solicitation to invest in DPT, securities, funds, partnership interests or other investments or funding or purchasing loans. It is the user's sole responsibility to conduct due diligence and research extensively into each DPT and platform, and understand that the volatility and unpredictability of the price of DPT may result in significant loss over a short period of time. No information on Hodlnaut should be considered to be business, legal, financial or tax advice regarding the use of Hodlnaut. Users should consult their own legal, financial, tax or other professional advisors before using Hodlnaut. Please refer to our website at https://www.hodlnaut.com/tos for the full Terms of Use.


